How to Start a Shopify Store: A Step-by-Step Tutorial (With Pictures)

Dear Dreamer,
Are you looking for legitimate ways to make extra money? I was in your exact shoes 10 years ago and have found some amazing side hustles and income streams along the way. My goal is to help you find the best opportunities that fit your lifestyle.
I want to personally invite you to subscribe to my free newsletter for practical, actionable advice delivered straight to your inbox. Join me and start your journey to financial freedom today!
I’ve always wanted to sell something online that could potentially earn residual income. The idea of setting up and maintaining a physical storefront sounds complex, time-consuming, and expensive. That’s why I started learning about how to start a Shopify store.
Have you wondered if you have what it takes to open an online store? To list your own products, add images and a customized logo, and create a checkout experience that’s seamless and user-friendly?
This Shopify review and tutorial will walk you through every important feature on the platform, and will teach you how to start your own online store.
But first: A little more about Shopify, which is a software solution that helps online sellers bring their products to customers. This leading eCommerce solution is recognized by top publications like Businesswire, Forbes, Entrepreneur Magazine and others. It provides online store-operators with a platform to help them deliver products to the general public.
Don’t forget to bookmark this post so you can come back to it later!
We foster relationships with brands we use and trust. The testimonials on our site represent real experiences, but they don’t guarantee you’ll achieve similar results. When you make purchases through our links to our partners, we may earn a commission. Your support helps us continue this work. You can read our full disclosure here.
7 Simple Steps to Open a Shopify Store
The process for creating your Shopify store is simple and straightforward. You can take the steps detailed in this tutorial, start to finish, in about an hour.
Take your time going through each section, and before you know it, you’ll be one step closer to launching your own store and turning a profit!
Here’s how to get started:
- Sign up with Shopify
- Set up your store
- Add your terms and privacy policy
- Choose a theme
- Add products
- Review Settings
- Launch your store
1. Sign Up with Shopify
Click here to sign up with Shopify. You can pick your plan immediately, or try the platform for free for 14 days to test-drive all of its features. With the free trial, there’s no commitment to buy unless you decide that Shopify is right for you.
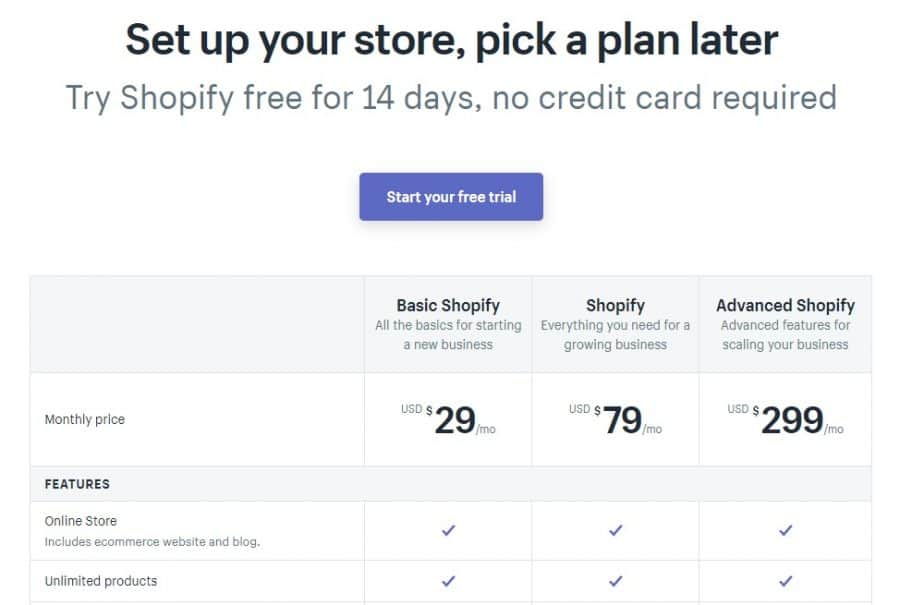
Which plan is the best for you?
Each Shopify plan offers its own unique features and benefits. I recommend that beginners start with the Shopify plan (middle tier) because of its reporting features.
The reports are helpful because they will give you as a seller a bird’s-eye view regarding what your sales are for a specific period, including traffic source, profit margin and other reports.
Here’s a peek at what a live store looks like:
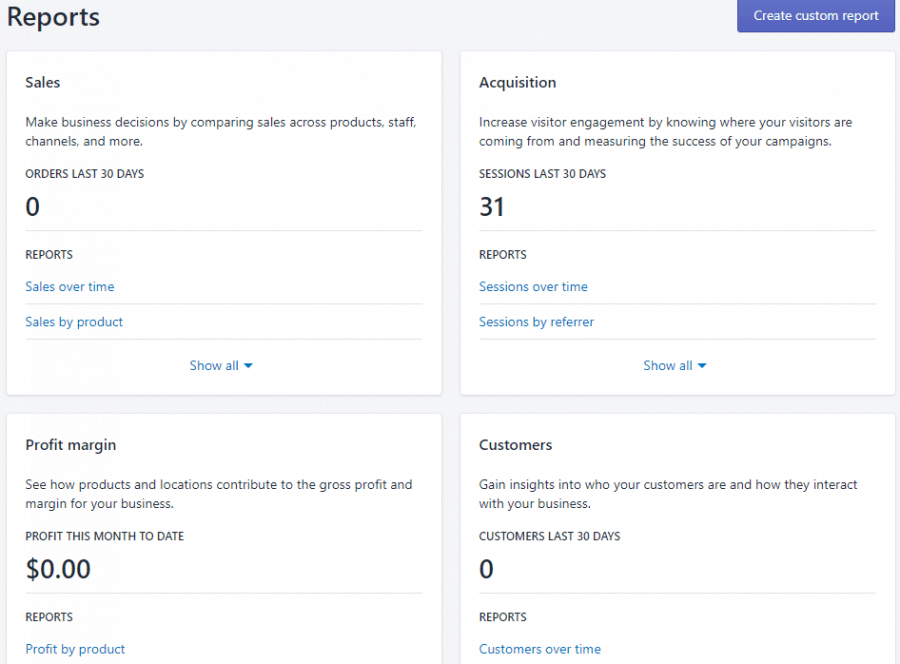
The Reports option will become useful when you are creating your Profit & Loss statement and doing your taxes.
Once you pick a plan, pay at checkout and then head to your Shopify dashboard!
Related: How to Make Money Selling on Amazon FBA
2. Set Up Your Store
Your Shopify dashboard will look like this:
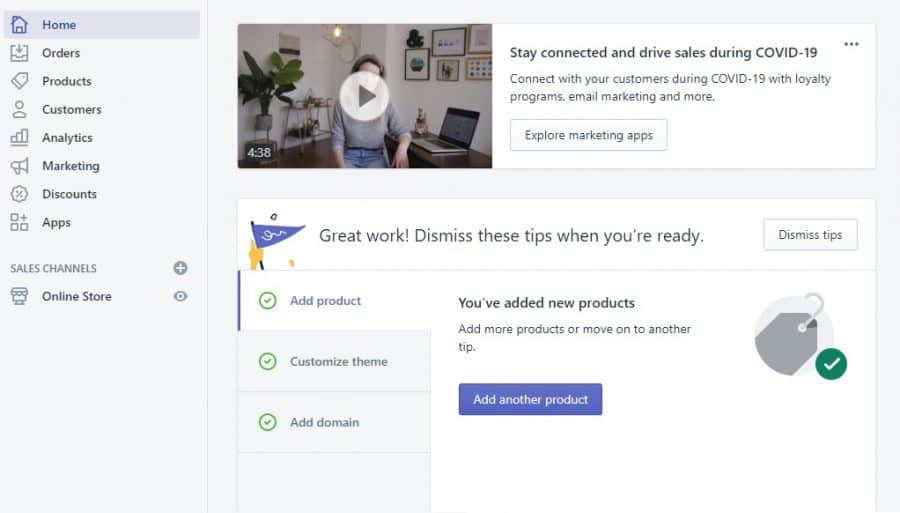
On the left is your vertical navigation bar, which contains:
- Home
- Orders
- Products
- Customers
- Analytics
- Marketing
- Discounts
- Apps
- Online Store
I am going to go over each section and subsection thoroughly, to give you the confidence to understand and navigate through your Shopify dashboard with ease.
Home
The Home link takes you back home to this dashboard (shown above). Wherever you are in your dashboard, you can click Home, to go back to this starting point.
Orders
Next is the section in which you can view all your orders. When you make a sale in your online store, your orders will appear here, where you will also be able to manually create a custom order.
You will find draft orders and abandoned checkouts in the Orders tab, too.
An abandoned checkout happens when your customer puts a product in his or her shopping cart, but doesn’t complete the checkout process. You can track the number of abandoned checkouts, products targeted, and more under the Orders tab.
Products
This is where you’ll add the items you have decided to sell. The following subsections will be available:
- All Products
- Inventory
- Purchase Orders
- Transfers
- Collections
- Gift cards
All Products will show you every product in your store, in all categories.
Inventory shows you the quantity of each product in stock. You can update your inventory numbers, import and export products in this subsection.
Manage your purchase orders in this subsection. This is about tracking the inventory supply received from your vendors. Shopify has this convenient subsection built in to help you manage your store more easily.
The Transfers subsection is about inventory transfers. If you have multiple store locations, this is helpful. If you don’t have multiple locations, you can ignore this.
Collections is where your product collections live.
For example, if you sell women’s apparel, your collections might consist of Tops, Bottoms, Dresses, Skirts, Accessories, etc. All of your collections (or store categories) will be in this area.
You can click into a Collection and do things like change the name (for example, changing dresses to maxi dresses) and add, remove, or edit collection photos and description; you can also add and/or remove products from the collection.
Lastly, the Gift Cards subsection allows you to create store gift cards! This is a fun feature that’s perfect for selling gift cards or using them for giveaways or other events.
Related: 5 Legitimate Car Wrap Advertising Jobs (+ Scams to Avoid)
Customers
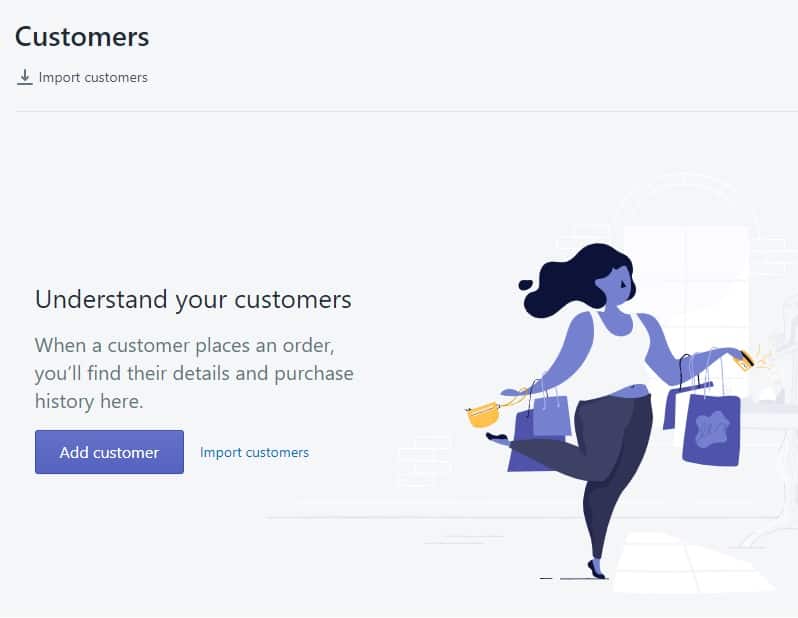
When your customer makes a store order, you can head to the Customers tab to review all of his or her information.
Analytics
If you want an overview of your store’s performance, you can go to the Analytics tab to review that.
You’ll find lots of helpful, detailed information here about your store sales, online store sessions, returning customer rate, and more.
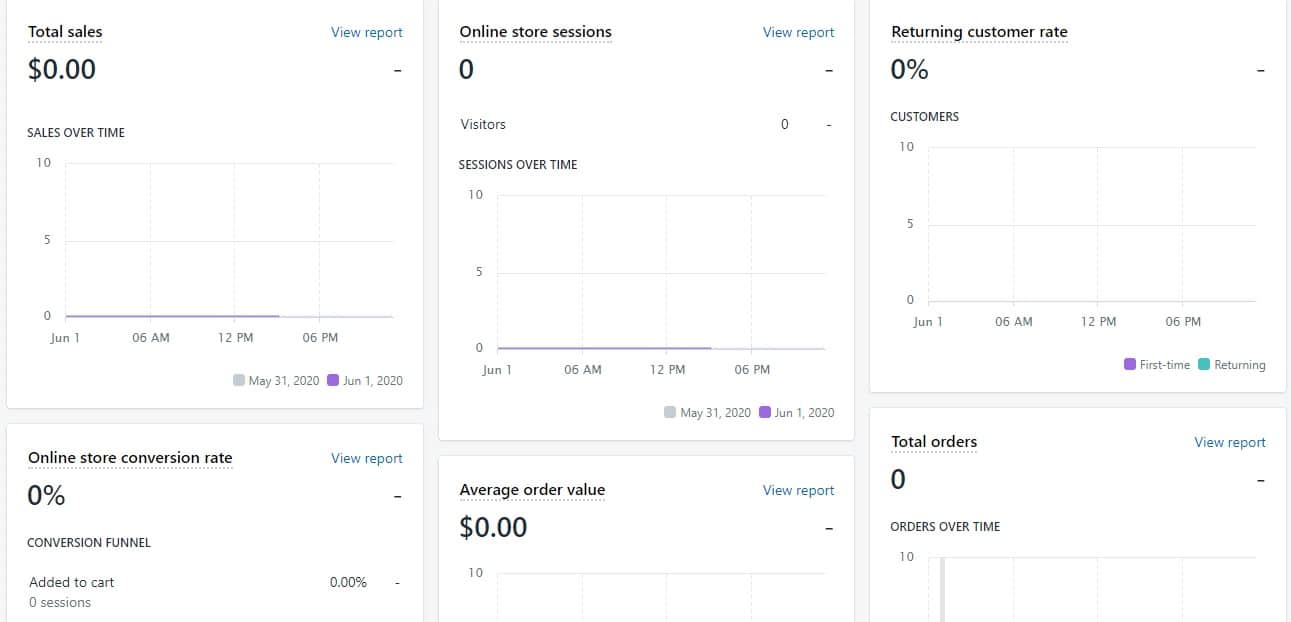
This will probably be one of the most trafficked tabs in Shopify that you’ll be reviewing.
Here, you can see your average order value, see what products are the most popular, review which pages are getting the most and least traffic, etc.
Plus, you can sift and filter through all of the data according to date, period, and more.
This is included in the mid-tier Shopify plan I recommended above.
There are three subsections in Analytics:
- Dashboards
- Reports
- Live View
Dashboards are where you are taken when you first click Analytics.
In Reports, you can look at things like your store behavior, finances, inventory and marketing reports, among other things. You can also create custom reports.
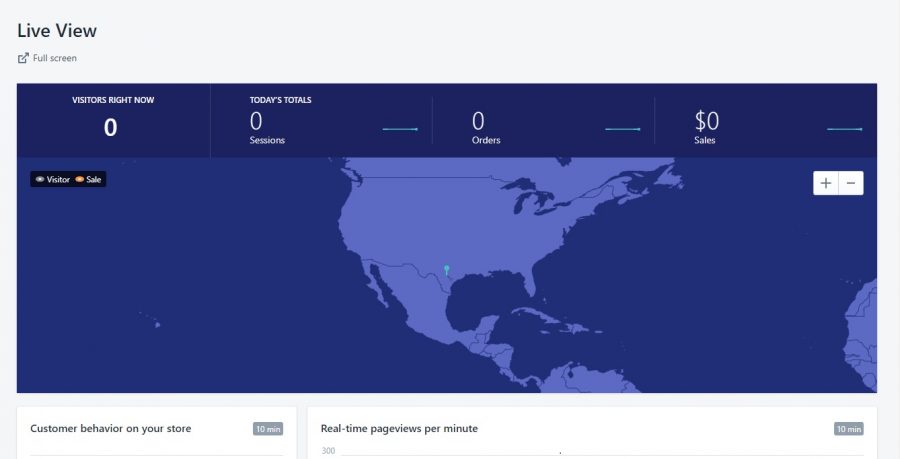
Then in Live View, you will see live activity on your store, like your current visitors, from where they are viewing your store website, and more info. Take a look below.
Marketing
Marketing is so important to eCommerce. Your marketing will help bring customers to your store, increase your store revenue, and keep your business up and running.
There are many things you can do from this tab:
- Create and manage your Shopify email
- Review orders that resulted from marketing
- Build brand engagement
- Take advantage of marketing apps like Pinterest, Snapchat, and Pinterest, among others
- Get helpful information and expert advice about marketing tactics to try
The three marketing subsections are:
- Overview
- Campaigns
- Automations
Overview is the first page you will be taken to when you click the Marketing tab.
Campaigns is the area in which you can create marketing campaigns for your store.
Automations is the place where you can build marketing automations through email marketing, to send custom messages to your customers.
I really want to highlight email marketing as a top-performing marketing method. This is one of the most underutilized marketing options that entrepreneurs use, but it’s incredibly easy – and it can be free, too!
How does email marketing work?
Add an email opt-in form to your store and use verbiage about money to attract consumers to share their email addresses. Most online retailers display email opt-in forms on their sites that promise a discount or coupon code just by joining their mailer.
Try this tactic, and watch your email list grow passively!
Then, use that list to email your customers about:
- Store news
- Announcements
- Sharing your social media
- Announcing a sale or discount
- Sharing a behind-the-scenes look at your office and providing insight about your process
Just one email – crafted and sent in a mere five minutes – could end up bringing you four-to-five figures in sales!
I have seen this happen to many entrepreneurs. There are other ways to promote your business, but email marketing is powerful. Do not ignore it.
Related: How Much Is 6 Figures? How To Make 6, 7, 8, 9, And 10 Figures
Discounts
Here, you can create a discount code for your customers to use when you’re offering a sale or hosting an event that awards coupon codes.
Apps
You’ll go to Apps when you want to visit the Shopify App Store. Here’s what it looks like:
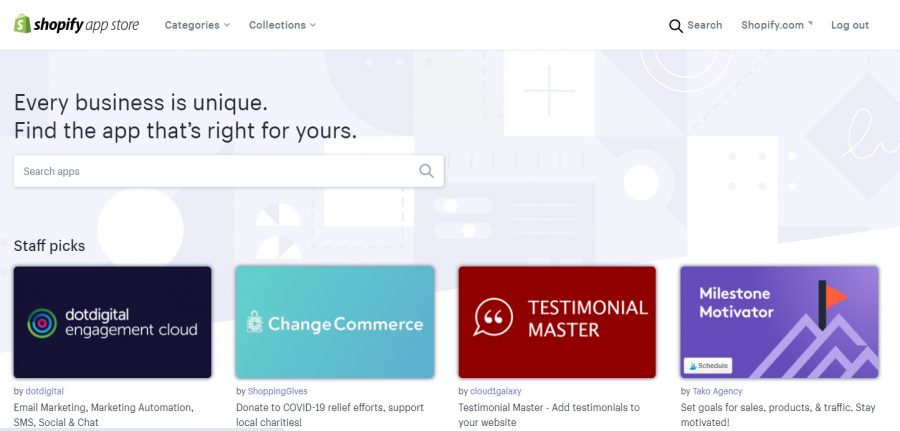
The Shopify App Store has apps to help you with every aspect of your business. You will find Shopify store apps that cover everything from marketing, to customer service, to fulfillment, and more.
You can download both free and paid apps for your store, and manage all of them from the Apps section of your Shopify dashboard. Take advantage of the more than 4,000 available apps to help you manage your store and drive sales.
Online Store
In Online Store, you can do things like apply a theme, write blog posts, add/remove pages, adjust your navigation, domains and preferences. For instance:
- Themes
- Blog Posts
- Pages
- Navigation
- Domain
- Preferences
Under Themes, you can head to the library to grab a free or paid theme to apply to your store.
If you’re not happy with the vast collection of themes available, you can instead visit places outside of Shopify, like ThemeForest and Template Monster.
Blog Posts holds all of the blog posts that you will publish on your store. You can build a community and use content marketing to attract consumers through blogging.
You may even be able to make money from the blog!
Check out these 31 amazing blogging resources to help you earn money through blogging.
Next are Pages, where you can add pages to your Shopify store. Here are some examples of pages you can add:
- About Us
- Contact Us
- FAQ
- Sizing Chart
It’s very simple to add a page and publish it onto your site.
The Navigation subsection is where you can design your store navigation. This is how customers will browse through your store’s website to find what they’re looking for.
For example, the Shopify dashboard navigation looks like this:
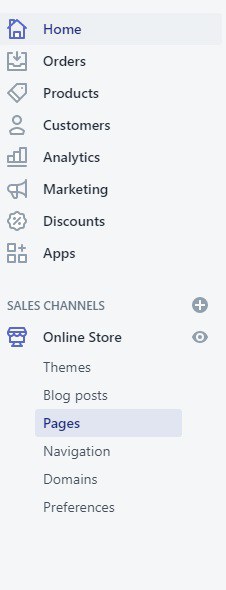
You can see each of the sections in the navigation and get an idea about where each button will lead you.
Here is an example of how the navigation bar might be laid out for a women’s online fashion store:
- About Us
- Tops
- Bottoms
- Dresses
- Accessories
- FAQ
- Sizing Chart
- Contact Us
The navigation is important, because this is how your customer will be able to move around your store.
I have seen many online stores that had invisible pages on their websites. They had pages, but customers couldn’t find them because they weren’t in the navigation! Keep your Shopify store as user-friendly as possible.
This is what the Navigation subsection looks like in the Shopify dashboard:
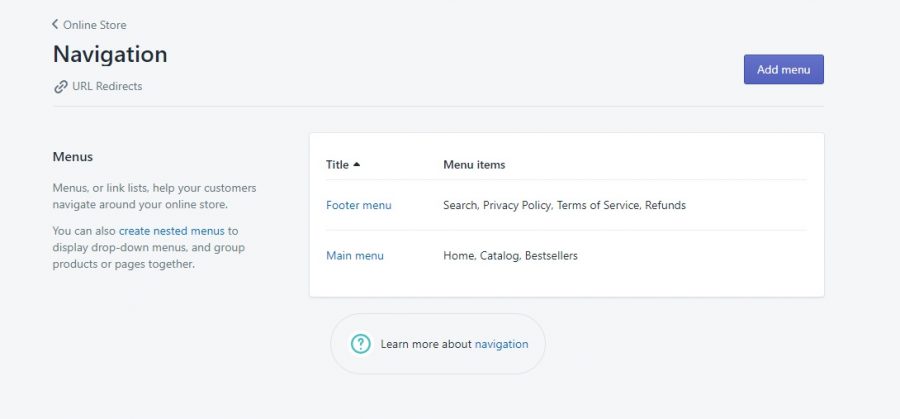
This is an example from a live store. It has two menus: the main menu and the footer menu. The main menu is the primary navigation bar, where customers can search product categories, pages, etc. The footer menu is at the bottom of the online store website.
You have full control over navigation, and you can customize it exactly as you wish.
The Domains subcategory provides information about your store’s domain. When you first set up your Shopify store, you’ll have a website with .myshopify.com at the end.
If you want a professional-looking store, I highly recommend that you invest in buying a domain. You can find cheap domains on places like Namecheap and connect them through Shopify, or you can buy your domain right through Shopify on the Domains page.
Lastly, Preferences is where you can add some SEO magic to your store. SEO – or search engine optimization – is the stuff that gets your website to rank in search engines like Google.
Here is where you can add a title, meta description, social sharing images, Google Analytics code and Facebook pixel; you can even password-protect your store.
And that wraps up the entire Shopify dashboard!
3. Add Terms of Service, Plus Other Policies
Once you’ve finished the store setup, add your policies.
First, go to Settings, then click Legal.
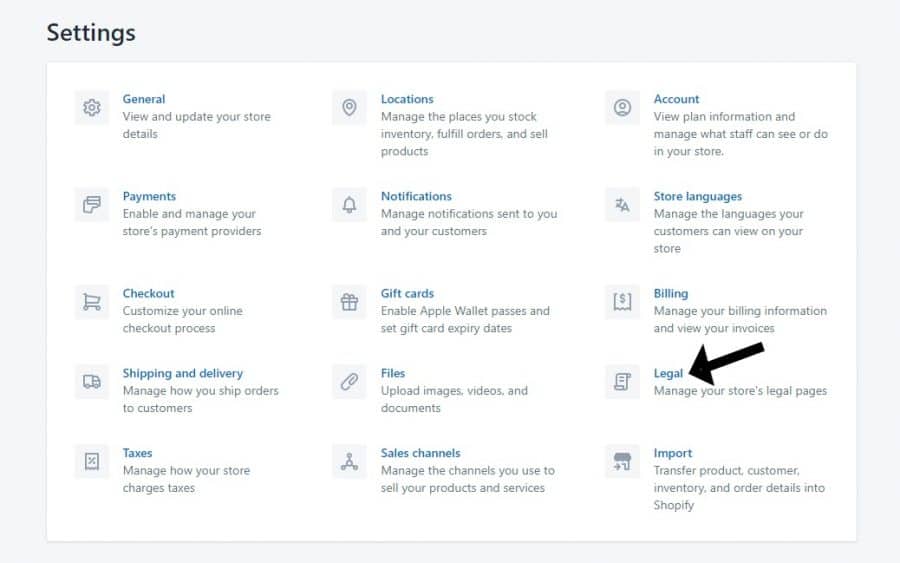
There are four policies on this page that you can edit:
- Refund policy
- Privacy policy
- Terms of service
- Shipping policy
The first three policies will autofill for you if you select “Replace With Template” at the bottom of each.
You can use this template for your policy, but make sure you are editing to match your store. There are a few places in each template where you will need to add your personalized information: store name, address, phone number, email address, etc.
The Shipping Policy does not have a prefilled template, so if you choose to display your Shipping Policy on your website, you’ll have to write it yourself.
4. Choose a Theme
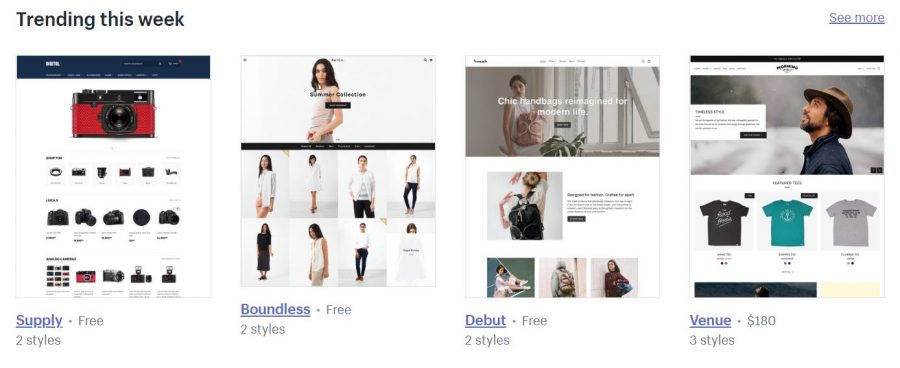
In Online Store>Themes you can head to the Theme Library to pick a theme for your store. There are a ton of different themes available, some paid and some free.
Pick your favorite and apply it to your store!
5. Add Products
You can add your products under the Products tab in the navigation.
When you select “Add Product,” you’ll land on this page:
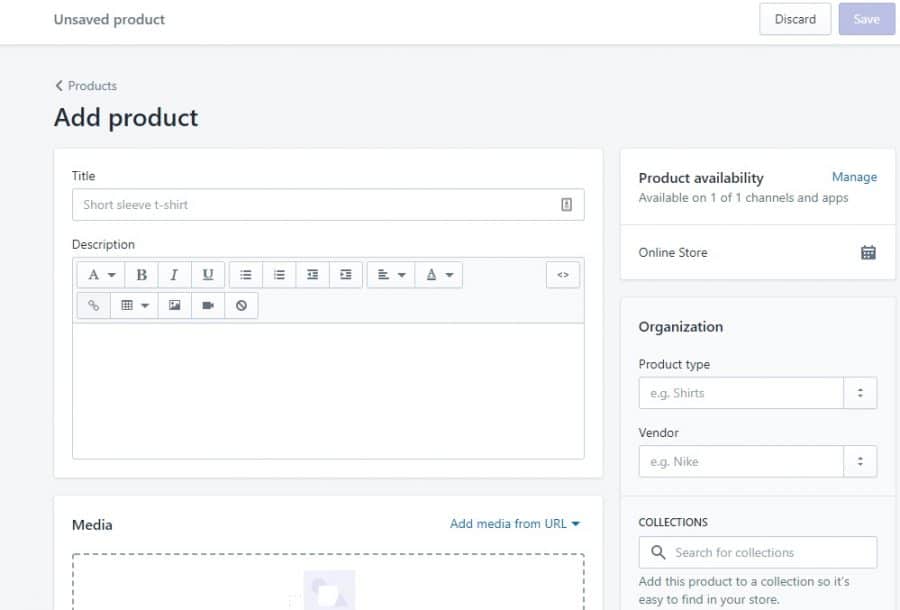
You’ll be able to name your product, write a keyword-rich description, assign a collection, designate the product type, add media (like video and pictures) and more.
When you’re done, click Save, and your product will be published.
6. Review Settings
Your Settings look like this:
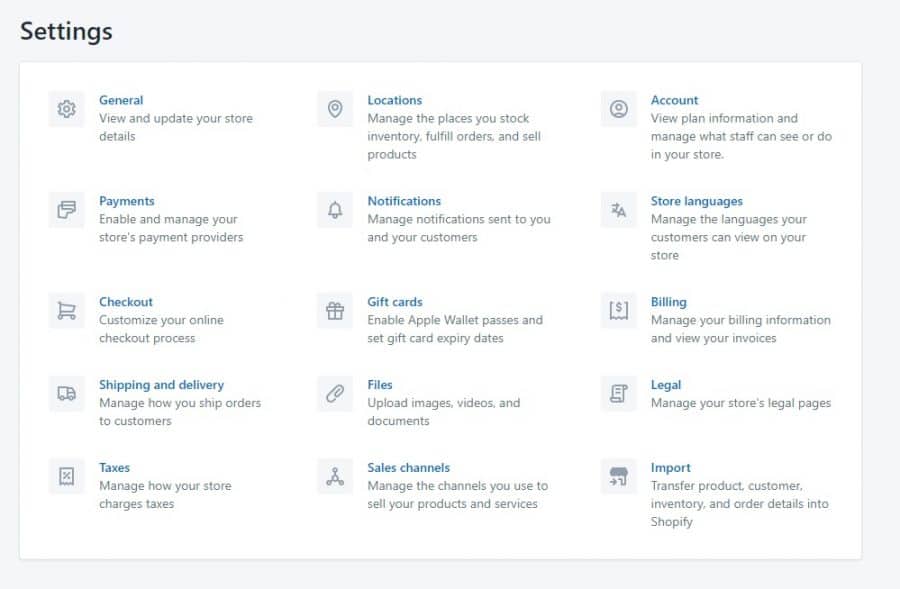
You get here by clicking the gear wheel at the bottom left of your Shopify dashboard navigation.
This area has 15 sections:
- General
- Locations
- Account
- Payments
- Notifications
- Store Languages
- Checkout
- Gift cards
- Billing
- Shipping and Delivery
- Files
- Legal
- Taxes
- Sales Channels
- Imports
Most of these are self-explanatory, and some – like Legal – have already been covered.
I do want to highlight some important areas.
Shipping & Delivery
It is important that you get this part right. The Shipping & Delivery section is where you control your shipping rates and settings.
Here, you can manage how you ship orders:
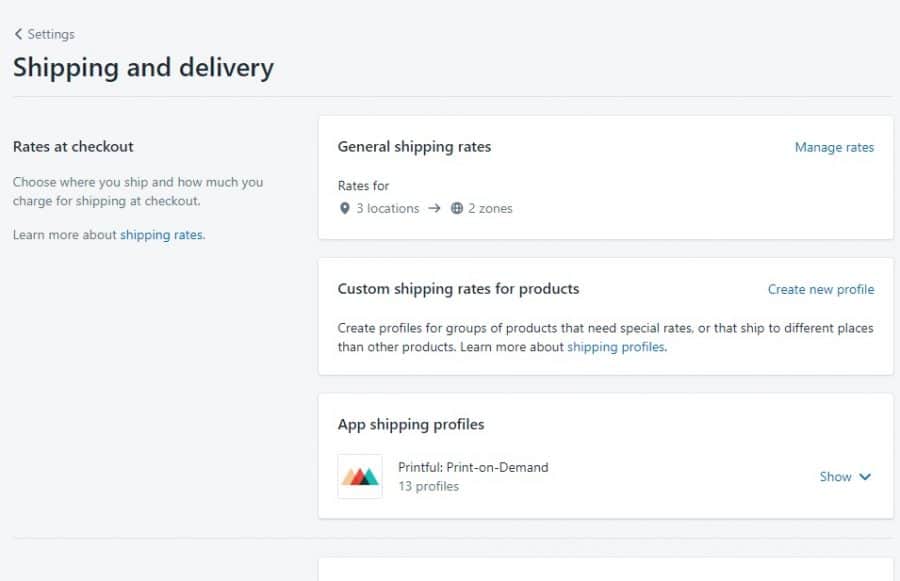
Start with your General Shipping rates.
This is also where you can set your “Ship From” location and domestic and international shipping settings. Create shipping zones, pick mail carriers like USPS or UPS, and others and do much more right from here.
There are many ways to customize your shipping settings, including selecting free shipping, flat-rate shipping, and more.
For more information about setting up your shipping rates, check out this awesome resource from Shopify to walk you through the process.
Sales Channels
Sales Channels is where you will manage the channels from where you sell your products, like your online Shopify store, Amazon, Wanelo, and more.
Click Add Sales Channel.
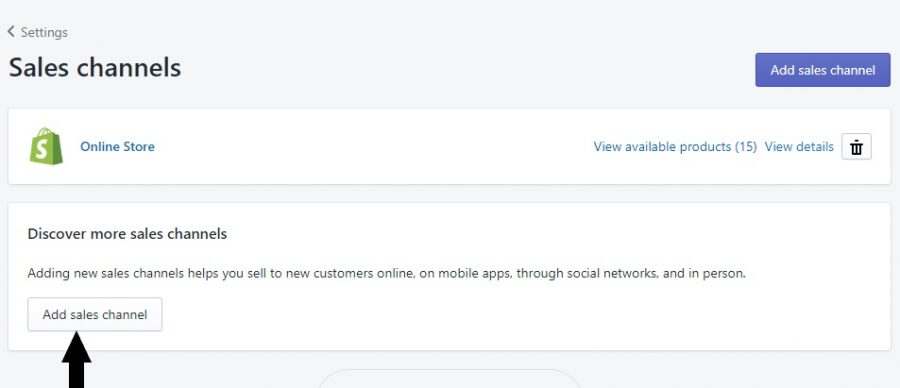
Then, pick the Sales Channels you’d like to add to your store.
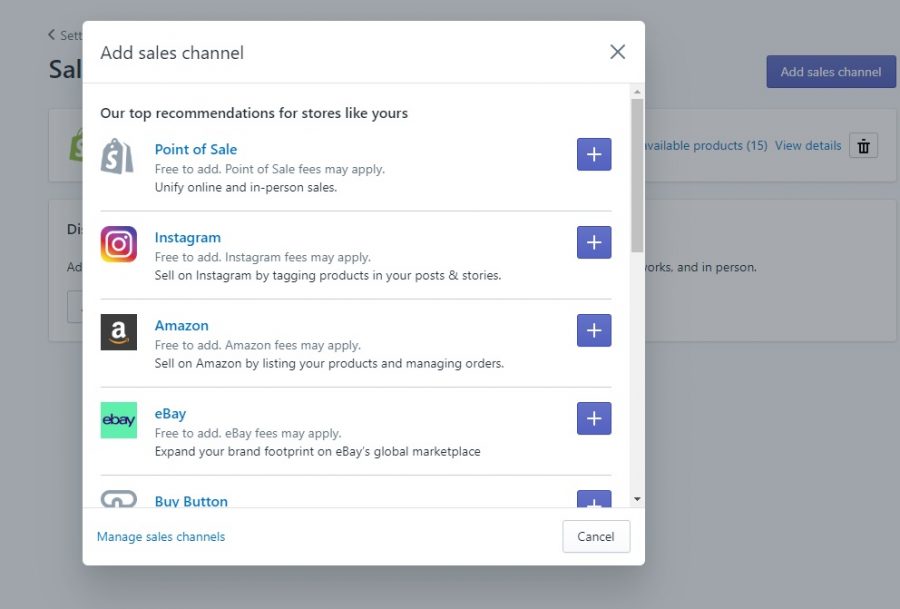
After picking each sales channel, you’ll go through the setup process before beginning to sell on those channels!
Locations
In Locations, if your store is operated in multiple areas or has multiple warehouse locations, you can add each location here.
Taxes
The Taxes page lets you manage taxes in various areas.
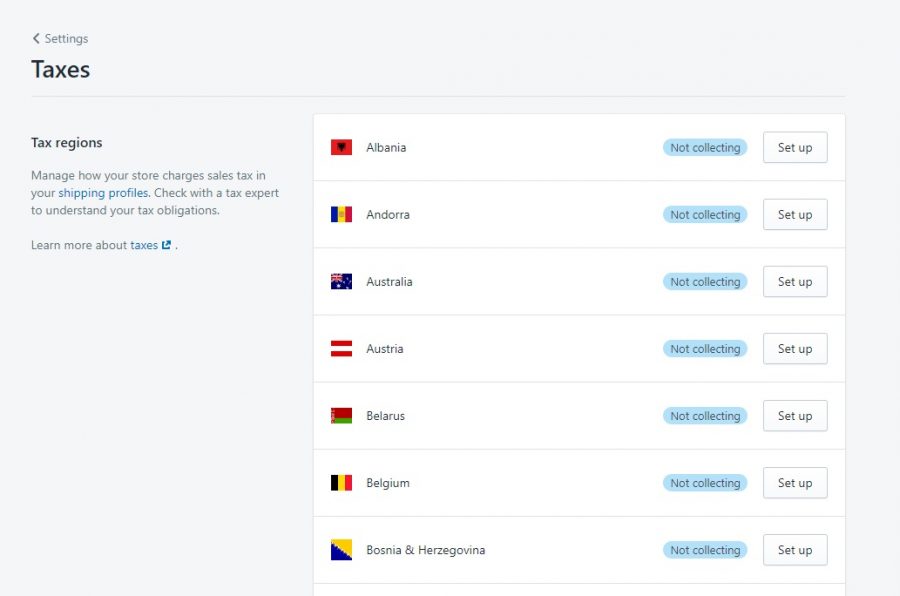
To learn more about Taxes, review this Shopify resource.
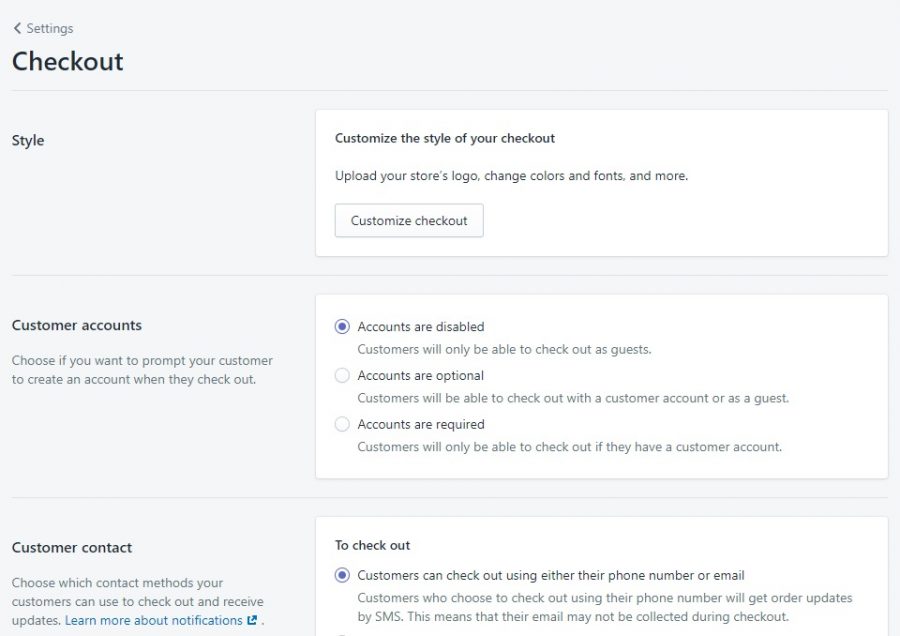
Creating a Custom Checkout in Shopify
If you want to create a customized checkout experience, head to Checkout for options like:
- Adding a logo in checkout
- Customizing colors and fonts
Customizing Payments in Shopify
Head to the Payments page to control how your store accepts payments. You can pick multiple payment providers like Amazon Pay, connect third-party providers, and much more.
If you want to provide payment flexibility to your customers with multiple payment options, this page can help you accomplish that!
I recommend you familiarize yourself with the entire Settings page. The other categories not covered here are pretty self-explanatory. If you have any questions, you can read Shopify’s handy Help Section guides, which walk you through every single section.
7. Launch Your Store
Launching your Shopify store is an exciting process. Don’t feel overwhelmed by the number of steps. Just take your time and make your way through each part, so you will be prepared when you launch.
For sellers desiring to sell physical and/or digital products, Shopify is an incredible platform that you can trust to deliver your goods to your customers the way you want.
If you have additional questions on how to start a Shopify store, comment down below and we’d be happy to help!
Sign up for a free 14-day trial to see if Shopify is right for you.


